Showing posts with label Event - Halloween. Show all posts

Sunday, 21 October 2012

ABAC Sunday - 'Mummy' bag

My Anything But A Card, (ABAC),  project today is a bag using the new "Petite Purse" die for the Big Shot machine.

I've actually made quite a few little bags now as it is so easy and very addictive but the first one I wanted to share with you is my little 'Mummy' bag that I made for Halloween treats.


I used 'Naturals Ivory' card stock to cut the bag out, then ripped the off cutes and inked the edges in 'Crumb Cake' ink to give the tatty look, and adhered to the bag.  I made sure that whilst adhering the ripped pieces I didn't cover the hold for the closure part of the bag, which was very easy to do.  I also used a long ripped piece for the handle rather that use the one that gets cut out with the die, just to keep the tatty look.


I used brown card stock that I cut with the circle punch from the 'Itty Bitty shapes pack' and added the 'Googly Eyes' that you can either get separately or as part of the 'Ghoulish Googlies Designer Kit'

This was fun to do and I think it's a really cute Halloween project, and these little bags actually hold cute a bit in side, I've put 8 little chocolate "eyeballs" that I got from Waitrose inside, so plenty for own little monster.

If you want any further information on how to make these little bags or would like to buy the bits to make your own, please don't hesitate to get in contact.

Have a great day... xx

Saturday, 20 October 2012

SATURDAY INSPIRATION ~ Stampin' Up Catalogue

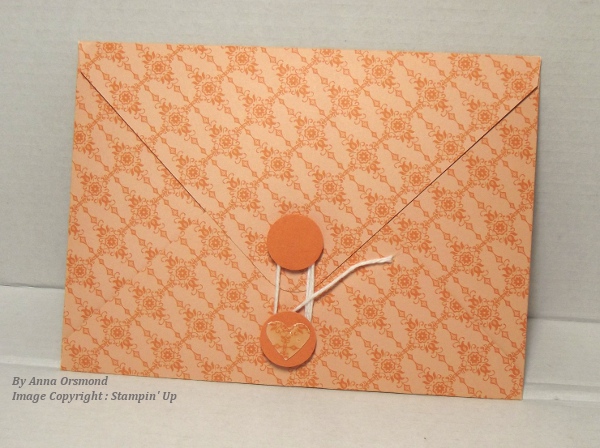
This week I'm sharing a Halloween Invitation that I made.


as you can see from the photo below, the envelope is completely open and you place the invitation in the centre of the open envelope before you seal it up.


You seal the envelope by folding in the sides, then the bottom, then the top..


.. and finally sealing it by wrapping the twine round the two popped up 'stoppers'.  I made these using a circle punch and popping them up with two dimensional adhesive pieces.  


The stamp set I got the little Halloween pumpkin from was "Button Buddies".  I chose this stamp as I just wanted a little image without it being too obviously 'spooky Halloween'


And my inspiration?  well that came from the "Sealed with Love" kit, which is on page 35 of the current Autumn/Winter mini catalogue.  It's a adorable little kit but not really suitable for what I wanted.


Hope you like it and remember, inspiration comes from many places, enjoy!   xx


Monday, 17 September 2012

Retiring Designer Series Paper

Hello there,

Just wanted to quickly share with you a couple of cards I've made in the last few days that uses some of the great retiring DSP from the 2011/12 Stampin' Up catalogue. Also, all DSP is currently reduced in price by  25 or 40% ~ yay!


This first card uses the Christmas themed "Holly Berry" Speciality DSP, which is currently 40% off, so making it just £6.90 per pack.


My 2nd share today is a Halloween themed card using the "Frightful Sight" DSP, which is also currently 40% off, making it just £5.97 per pack

I used the Oval punches to make the pumpkins and drew on the Jack-o-lantern faces, for some reason I really like drawing these faces on myself!

You only have until the end of this month to get these great paper collections as the new catalogue is launched on the 1st October.

If you would like more information on what products are retiring at the end of this month or how to book a demonstration or have any questions regarding any Stampin' Up product, please do not hesitate to get in contact.

cheerio xx

Monday, 31 October 2011

HAPPY HALLOWEEN :o)

Happy Halloween everybody, I hope that what every you do you have a fun and safe evening.

A very quick little project for you that is currently sitting in my window.


Ok, so it looks a bit dull by day, but by night ....


It's a 360 degree luminaire, theses photos giving you an idea of what it looks like from all angles and it was so easy to make


Enjoy!


Project Ingredients

Stamp Sets : "Haunting Hill" Jumbo wheel
Card stock : "Basic Black" & Vellum cardstock
Colour : "StazOn" ink pad
Tools : "Sticky Strip" adhesive & Tea Light candle (Battery operated ones are safest)

Halloween Ideas - The good twin

Hello again,

Quickly wanted to share with you my "Good Brother" Halloween project.  You may remember my evil twin brother project from last week, ( see HERE ), well, this is the good twin.


He's a bit goofy lookin' you can see that this little chap wouldn't hurt a fly, or that little bat in the corner, but why is he the good brother do I hear you asking??

Well ... it's 'cos he gives presents...
Hopefully something more exciting that an Oyster card ~ lol!

Hope you like him...  :o)


Project Ingredients

Stamp Sets : "Delightful Dozen" & "Every Little Bit" Stamp Set.
Card stock : "Basic Black"; "River Rock" & "Pumpkin Pie" cardstock
Accessories :  Patterns designer series paper pack - Neutrals collection
Colour : "Soft Suede" Classic Ink pad & "Tangerine Tango" marker pen
Tools : Dimensional adhesive; VersaMarker pen; Versamark ink; Black &  white embossing powder and black & silver embossing powder mixed together..

Sunday, 23 October 2011

Halloween Ideas - Day 3

Quick post today so lets get straight on to the share which  is a one I shamelessly CASE'd as when I saw it I thought it was completely adorable and had to have a go at making one myself.

It's a 'Mummy' pillow box and the originator of this fabulous idea is Angie Kennedy Juda who is a very talented US Stampin' Up! demonstrator.


Angie has a video on how to make it, which can be found on youtube  HERE

It's made using the "Pillow Box" die for the Bigshot and it's great for putting in little treats or packets of sweets. 
Hope you love it as much as I do, come back tomorrow for another Halloween idea...xx


Project Ingredients


Card stock : "Naturals Ivory"; "Basic Black" & "Whisper White" cardstock
Colour : "Soft Suede" Classic Ink pad
Tools : "Snail" tape runner adhesive; 1/2" & 3/4" hole punches; Big Shot die cutting machine & "Pillow Box" die.

Friday, 21 October 2011

Halloween Ideas ~ Day 2

Hello, and welcome to day 2 in my week of Halloween projects.  I hope sharing these projects will give you some ideas for your Halloween crafting.

Today's share is a very simple card using the new jumbo wheel "Haunting Hill".  All I've done is use "Basic Black" classic ink to run the image over a piece of "Whisper White" cardstock, matted it onto some "Basic Black" cardstock and then adhered it to a "Basic Grey" card blank and used white embossing powder to heat emboss the sentiment.


This card can then be given, with a few colouring pens or pencils to a child to colour in rather than giving them loads of sweets on Halloween.  This card is also really easy to replicate quickly if your child wants to give out Halloween 'goodies' to their friends or classmates.

Hope you like it, as tomorrow is Saturday it will be a  "Countdown to Christmas" project, so the next Halloween project will be on Sunday... xx


Thursday, 20 October 2011

Halloween Ideas ~ Day 1


Today is the first day of a 5 day mini-series where I will be sharing some Halloween projects to, hopefully, give you some ideas for your Halloween crafting.

My first little project is a scary pumpkin card.


I  drew a pumpkin shape on some "Pumpkin Pie" card stock, (well, what other colour would you use??), cut it out and drew on the ridges of the pumpkin using a marker pen.  Then, using a Versa Marker, I drew on a scary mouth and eyes shapes and heat embossing using black embossing powder.  I used a scrap of "Soft Suede" for the little knob on the top of the pumpkin.

This pumpkin is a twin, and as you might know all twins have one good one and one evil one, well, at Halloween they do, so, as today's share was obviously the evil twin I still have the good twin to show you, which I will do later in the week.  Until then, happy crafting :o)  xx


Project Ingredients

Stamp Sets : "Delightful Dozen Stamp Set.
Card stock : "Basic Black"; "Soft Suede" & "Pumpkin Pie" cardstock
Accessories :  Patterns designer series paper pack - Neutrals collection
Colour : "Soft Suede" Classic Ink pad & "Tangerine Tango" marker pen
Tools : Dimensional adhesive; VersaMarker pen; Versamark ink; Black &  white embossing powder.