Sunday, 10 February 2013

Two more cute little bags

A very quick post to show you the two little bags I've made whilst I was doing the little bag tutorial.  (Sorry about the lighting, bulb went on one of my lamps today!!


These are the two bags I made whilst putting together my tutorial, the one in the front with the hearts is made out of two 6" x 6" pieces of DSP, the one further back is made out of 1 piece of 6" x 12" DSP.


The tutorial for this bag can be found HERE


The tutorial for this bag will be posted tomorrow (I'll update this picture with the link when done)

Enjoy & happy crafting!  xx


Project Ingredients
Accessories : "More Amore" DSP; "Striped Organdy" ribbon  in "Marina Mist" & "Natural Cotton" ribbon - this is carried over from the Autumn/Winter catalogue
Tools : Sticky Strip & Glue Pen adhesives


Cute bag Tutorial using two 6" x 6" pieces of DSP

As promised, here is the tutorial for the bag made out of two 6" x 6" pieces of DSP (or cardstock)


 Take two 6" x 6" pieces of DSP or cardstock


 Score them at 1 -4" on three sides


 Burnish all the score lines, on DSP it can be difficult to see the score marks, so be careful that you're following the score markes.


 Put the un-scored side at the top, as this is the opening of your bag and will help you visualise your finished.  On the bottom of the bag, on both sides, cut on the score lines up to the intersecting score line.  On one of the pieces you need to cut off the two bottom corners.

If you are making your bag out of cardstock, this is the stage I would do any stamping I wanted to do to decorate the cardstock.


 On the piece that has the corners cut off, put sticky strip on the three outer edges, as shown in the photo. Make sure you add the sticky strip to the side that you want showing on the outside of your bag.
If you are a bit nervous of sticky strip as it is a very strong adhesive, then, after you've removed the protective red backing, run a line of Glue Stick over the sticky strip as this will allow you to be able to play with your positioning a bit before the strong adhesive on the sticky strip takes over.  Alternatively, use Tombow Mono Multi Glue, I just prefer the sticky stripe as I seem to get into a mess when I use the Tombow.


 Start sticking your two pieces together, I like to start with the outside edges as I find it easier to line up this way.


 The sides all adhered together.  Then adhere the bottom section to form your bag.


 There are lots of different ways to add handles to your bag.  For this one put ribbon handles on either side of the bag.  To help me with my placement I made a little template so that I could be sure the handles would be spaced the way I wanted them.


 I measured out about 25cm of ribbon, cut the ends at a diagonal, which helps with feeding the ribbon through the holes.  Once threaded through, I tied a knot in the end, cut the ends of the ribbon to tidy them up.


 I repeated the process for all the other holes.


 This is the end result, you can now decorate with additional punched out images or gift tags etc.


If there is anything in this tutorial that is not clear, then please let me know, I really want these to be easy to follow.

Thanks & enjoy your bag making :o) xx


Saturday, 9 February 2013

Blackboard Technique card

Another little Valentine's share for you today highlighting the "Blackboard" technique.  Basically, this technique makes your card look like a blackboard, with all the residue chalk from all the cleaning - was it just me or was being asked to clean the blackboard at school seem like a reward??


I stamped the main Valentine's image and the swirls in versamark ink and heat embossed using white embossing powder. The good thing with this technique is that you don't have to worry about stray embossing powder sticking to your project, in fact it all adds to the effect. 
I drew the outer lines using a white pencil that I got from my local art shop.


I did this by wiping a sponge with just a touch of "Whisper White" craft ink over the whole of the black layer using the same motion that I would use to clean a blackboard. You can see the 'smeared' chalk dust type effect better on this angle that gives it that 'Blackboard' feel.

I also made the card using "Real Red" cardstock, just to see what the difference would be.


I actually quite like it.

but it's not so easy to see the 'smeared. chalk effect but it's easier to see IRL.

Hope you like it, let me know if you would like me to demo' this technique to you and a group of friends at a Stampin' Up workshop or if you would like to purchase any of the products use, please get in touch.

Until next time.... xx


Project Ingredients
Stamp Sets : "You Are Loved" & "Creative Elements"
Card stock : "Basic Black", "Real Read" & "Not Quite Navy"
Accessories : White pencil - NOT Stampin' Up
Tools : Tape runner adhesive; Versamark Ink; White Embossing Powder

Friday, 8 February 2013

Let the paper do the talking..

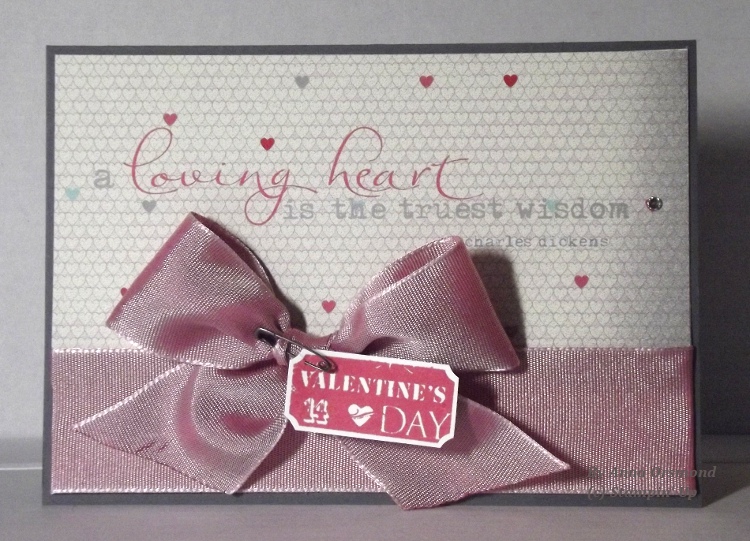
My share with for you today is a card where I've basically let the DSP do all the talking, well, when it's this pretty why wouldn't you??


I used the "More Amore" speciality DSP and one of the sheets has this lovely sentiment on, that is large enough to cover a standard A6 card front perfectly.


All I added was a lovely big, pink bow, using the very lush "Two-Tone" ribbon and added the cute valentine's ticket from the "That's the Ticket" stamp set.  I used the "Duo Ticket" punch to punch it out perfectly and used a small safety pin from the vintage trinkets set to attach it.

All so simple, but when things are this gorgeous you can let them do all the work.


Project Ingredients
Stamp Sets : "That's the Ticket"
Card stock : "Basic Gray"
Accessories :  "More Amore" Speciality DSP; "Two-tone" ribbon; Vintage trinkets;
Colour:  "Real Red" classic ink pad
Tools : Tape runner adhesive; Ticket punch

Thursday, 7 February 2013

Shabby Chic card

Hello,

Now today's share is a shabby chic card, now this is not my style at all but I love the look of them so wanted to give it a go and the gorgeous "Artisan Embellishment kit" in the new Spring/Summer catalogue calls out for this style so I thought it was about time I gave it a go and it's good to break out of the mould and try new things.


I used lots of layers with dollies, crochet trim and all sorts of pretty things embellishments from the kit.


The sentiment stamp set is the "Feel Goods", which is a great, bold sentiment stamp set; the heart is from the new "Hearts a Flutter" stamp set that can be found in the new Spring/Summer catalogue, as can the dollies, though you do get 2 dollies within the "Artisan Embellishment kit".

Hmm... I'm not sure if I like it, it does look nicer in real life, but even so....  I'll just have to keep practising! xx


Tuesday, 5 February 2013

Swallowtail card

Hi There,

My share today is another card using the gorgeous "Swallowtail" stamp, which can be found in the new Spring/Summer mini catalogue.  This stamp is huge so is great for just stamping bits of it.


My card base is 4 1-4" square with the top layer being 4" square.

I stamped the butterfly image in back Stazon ink and then used marker pens and a blender pen to colour in.


I dabbed some "Champagne Mist" shimmer paint on the wings of the butterfly to give them that shimmery effect that butterflies have.

If you want any information on this or any project I share, please do not hesitate to get in touch.

Short but sweet today, hope you like the card... xx

Sunday, 3 February 2013

ABAC Sunday

Today on Anything But A Card, (ABAC), Sunday I am going to share with you a couple of little gift bags I made.


These bags start life out as 2 pieces of 6" x 6" DSP, for my bags I used the "Sycamore Street" DSP, which is FREE as part of the "Sale-a-bration" event.

They came out slightly different sizes as I folded over the lip of the the lighter blue one to give a bit more contrast as you can see the other side of the paper.


The darker blue one I left as it is.

These little bags are cute and so quick and easy to make and a great way to make a gift bag as you need them and personalise it to the person or the gift, and so much cheaper and whilst these are all cute a little, you could obviously make bigger ones by just starting out with bigger pieces of patterned paper or cardstock to start with.

I'm going to try and do a picture tutorial on how to make these and when I do, I'll update this post to include it.