Tuesday, 17 April 2012

"Chevron" Technique Tutorial

Hello again, as promised in my post form this morning, I have for you a tutorial showing how to do the "Chevron" technique.

Step 1


 You need some stripy patterned paper, I used "Cheerful Treat" DSP, the hostess only item.

I cut a section of 6 x 6"


Step 2


 I cut this section on the diagonal.


Step 3


Then I cut 1cm strips using the diagonal line as my straight edge to base my cuts on.


Step 4


I then repeated this for another 6 x 6" section of this DSP.  I used the other section that had the same colours.


Step 5

Then match up the patterns, alternating the direction the lines go to produce the "Chevron" effect.

Keep doing this until you find a pattern you like.

Step 6


I arranged mine so that a specific pink line within the pattern lined up, (see area in box within photo), so that it created a more random looking pattern. 


Step 7


Once you are happy, adhere to a piece of scrap paper.


Step 8

Trim off edges and make to required size.

Obviously the more pieces of paper you can match up the larger the size you can have.  This is easier with a relativity simple stripe of just a few colours, but my sample is very colourful, but hopefully helps you to see the pattern.

 Step 9

Create your card.

I matted mine on a piece of "Rich Razzlebury" cardstock, which I adhered to the right side of the "Old Olive" card blank, then added a "Very Vanilla" taffeta bow on the left side, added a sentiment from the "Happiest Birthday Wishes" stamp set.


Hope this was clear and helpful, if you have any questions or need anything clarifying, please do not hesitate to get in contact or leave a comment.

Thanks  ... xx


"Chevron" Technique

A very brief post for you this morning as I wanted to quickly share with you a card that highlights the "Chevron" technique.


It's made by placing stripy patterned paper next to each other to form the chevron pattern.

I was hoping to have a little tutorial for you on how to do this but I'm still trying to sort out the photos so I will be back later today, hopefully, with all the details on how to do this very striking technique.

Until later ... xx


 Project Ingredients

Stamp Sets : "Happiest Birthday Wishes
Card stock : "Lucky Limeade" & "Whisper White"
Accessories : "Cheerful Treat" DSP
Colour:  "Lucky Limeade" & "Concord Crush"  classic ink pads
Tools : Dimensional Adhesive; Tape runner adhesive;  "1-3/4" Scallop" punch & "1-3/8" Circle" punch

Monday, 16 April 2012

Monday CASE'd Book

I have a CASE'd card for you today.  For those who are unfamiliar with the term it means that I've copied it, which in the stamping and paper craft world is completely acceptable and in some ways encouraged, just as long as you give due credit to the originator.

My card today was CASE'd from the Stampin' Up's catalogue and the original can be found on Pg 120.


I changed the colour and a few of the embellishments but other than that, it's pretty much the same.  I made this card a couple of weeks ago when I was feeling like I had lost my crafty mojo, so, for me, CASE'ing a card was a great way to get me making something so that I felt inspired again.  That's the great thing about the catalogue, it's got so many great projects in there to inspire and spark off the imagination.

Have a great day .... xx


 Project Ingredients

Stamp Sets : "Aviary";  "Happiest Birthday Wishes" & "Tiny Tags"
Card stock : "Whisper White" & "Night of Navy"
Accessories : Patterns Designer Series paper Stack in Regals.
Colour:  StazOn Ink; "Pool Party"; "Island Indigo" & "Poppy Parade" classic ink pads
Tools : Dimensional Adhesive; Tape runner adhesive;  "Dotted Scallop Ribbon" border punch; "Tag" punch; "Corner" Punch

Sunday, 15 April 2012

Scrapbook Page

Hello,

Today I'm sharing with you a 12" x 12" scrapbook page that I put together using one of the "Simply Scrappin" kits from Stampin' Up.  The kit I used is called "Country Club" and is one of the kits that I used to make one of the cards I shared yesterday.

It's the first 12" x 12" physical scrapbook page I've done.  Up to now my scrapbooking has been confined to much smaller memory books or digital pages so a blank 12" x 12" page seemed quite daunting at first, but I knew the photo's I wanted to use and the story I wanted to tell, so actually I found that I filled up the page quite quickly.

(sorry about the terrible photo ~ working on it!)

The photo's are ones of my DS, Ben, when he was about 5 and they were taken when we were on holiday in Portugal.

I like the basic layout but I'm not that please with it overall so I stopped working on it as I decided that it would be easier to add things later than try and take things off if I add too much at this stage.
I am glad I got the memory down and I've been able to use these photos to perfectly illustrate a family story for the future, which is, after all, what scrapbooking is all about and I intend to do a companion page using up to date photo's to further illustrate my story so I'll see what I feel it needs when I see the two together.

If you are interested in learning more about scrapbooking, capturing memories or any Stampin' Up products, then please do not hesitate to get in touch, details above.

 xx


 Project Ingredients

Accessories : "Country Club" Simply Scrappin' kit
Colour:  "Whisper White" craft ink
Tools : Dimensional Adhesive; Tape runner adhesive

Saturday, 14 April 2012

"Scrappy" Cards

Hello,

Hope you are having a lovely weekend so far.

Today I wanted to share with you a couple of cards I've made using "Simply Scrappin" kits, which, as the name suggests, are actually kits designed with the Scrapbooker in mind, but that doesn't mean you can't make cards out of them.

Both cards are made using different kits but the same sketch.

This first card was made using the "Tea Time" kit


This second one was made using the "Country Club" kit.


This is a close up of the main embellishment on the card which is so easy to make with the punches.


These kits are great, you get DSP, Textured card stock and self-adhesive die cuts.  Everything you need to make a great scrapbooking page, or, as shown above, a quite and simple card.

Tomorrow I will be back with a scrapbook page I put together using one of the kits, until then, take care..... xx


 Project Ingredients

Stamp Sets : "Elementary Elegance" - RETIRED
Card stock : "Whisper White"
Accessories : "Tea Time" & "Country Club" Simply Scrappin' kits; "Lucky Limeade" brads.
Colour:  StazOn Ink
Tools : Dimensional Adhesive; Tape runner adhesive; "5-Petal Flower" punch; "Fancy Flower" punch & "Dotted Scallop Ribbon" border punch

Wednesday, 11 April 2012

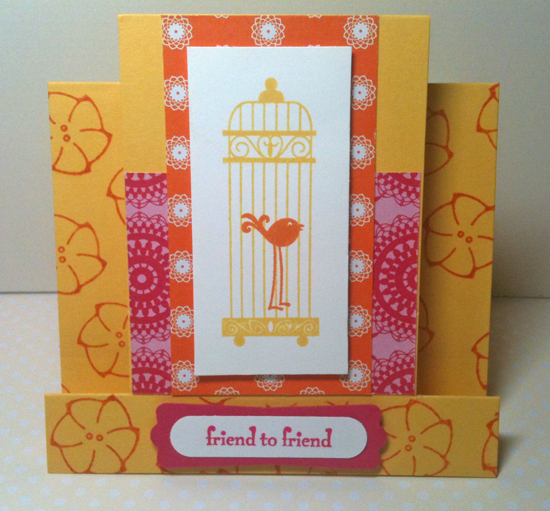
Side Stepper card

Hello there,  well I'm feeling shattered today as I stayed up to watch a live game of Baseball that had 'extra time' and didn't finish until just before 5am - Yes, I know, crazy.  I subscribe to a website that gives me access to all games that have been played so far within the season so I usually catch up a sensible times but I made the mistake of starting to watch a live game that was really exciting and couldn't stop, daft old bat that I am, so please excuse me if this post is completely illegible - lol!

I did get a chance to craft whilst watching though as my computer monitor is on my crafting desk, so crafting and baseball at the same time ~ yay!

My share today is a little, (4x4"), side stepper card.

Very colourful!

I haven't made one of these before and I'd only seen the dimensions for larger sizes so I spent quite a lot of time with some scrap cardstock to get the proportions right and I made made myself a template with all the details on before I made the actual card.

Side view.

The colours are really bright and cheerful and remind me of summer, which is strange for me as I am defiantly an autumn/winter girl, I blame watching the baseball, it obviously put me in a warm and summery frame of mind.  (The ONLY good thing about spring/summer, from my point of view, is that it's baseball season!)

I'm pleased that I figured out how to do this card at this size and I'll defiantly be making more.

I'm just off to have a little nap, have a great day .... xx


 Project Ingredients

Stamp Sets : "Aviary"; "Button, Button" & "Pocket Silhouettes"
Card stock : "Daffodil Delight" & "Melon Mambo"
Accessories : "Flirtatious" Speciality DSP
Colour:  "Daffodil Delight" & "Pumpkin Pie"
Tools : Dimensional Adhesive; Tape runner adhesive; "Word Window" punch & "Modern Label" punch

Tuesday, 10 April 2012

Congratulation Card

Hello there, hope you had a wonderful Easter, I can't believe it's over it seem to fly by in no time, luckily I got some crafting done with my new Stampin' Up goodies that I will share with you later in the month as I used some new products that are not available until the beginning of next month  ;-)

My share for today is a 'Congratulaions' card that I sent to my lovely Stampin' Up upline Sarah-Jane  
she made Silver 2 in promotion last month so obviously I had to send her a card to congratulate her as she works so hard and is a great friend and inspiration.

Now I knew I had to use the silver embossing powder but it took me absolute ages to decide what colours to use with it.  In the end I went for a "Basic Gray" card blank and "Concord Crush" top layer ~ love this colour.  I had to use my lovely "Stylish Star" stamp, because she is a little Star!

Ooo, shiny!
I embossed all the edges of the "Concord Crush by rubbing the Versamark ink pad directly to the edges and matted it onto "Basic Black cardstock to make the silver stand out even more.

I was quite pleased how it turned out in the end, even if this card did take the longest I've ever taken over a card ~ lol!

have a great day ... xx


Project Ingredients

Stamp Sets : "Stylish Star" & "Curly Cute"
Card stock : "Concord Crush"; "Basic Black" & "Basic Gray"
Colour:  Versamark Ink;
Tools : Silver embossing powder; Heat tool