As promised early today, I have pleasure in showing you how to make this Scallop Square die box.

 Cut out a Square Scallop using your "Square Scallop" die for the Big Shot. Using either your scoring attachment on your paper trimmer or your bone folder, score between the 2nd and 3rd scallop and then the 7th and 8th, turn the piece by 90 degrees and then score between the 3rd and 4th scallop and the 6th and 7th scallop. See picture on the left.
 Cut on the score lines between the 3rd and 4th scallop and 6th & 7th score lines up to the score line going in the other direction, Add Sticky Strip, all as indicated in the photo on the left.
If you find that Sticky Strip is a bit unforgiving for you, then use a glue stick such as Pritt Stick and go over the adhesive on the sticky strip prior to fixing your project together, this should make things a bit easier.
 Lift up and adhere the walls of box that only have the one strip of Sticky strip, this is the back of the box.
 Lift up the other walls of the box. Make sure the middle scallop on the sides match up, this should be easily achieved.
You can now decorated your box. I added a piece of "Pool Party" ruffled ribbon around mine, adhered at the front. I stamped an image from the "Posy Punch" stamp set in "Calypso Coral" ink and punched that and a piece of "Pool Party" cardstock out using the "Fancy Flower" punch, adhered them together. I stamped the circle image, also from "Posy Punch" stamp set, added a "Calypso Coral" brad from the "Printed Brads" collection and adhered that to the punched out piece with a dimensional and adhered the whole embellishment over the ribbon with another dimensional.
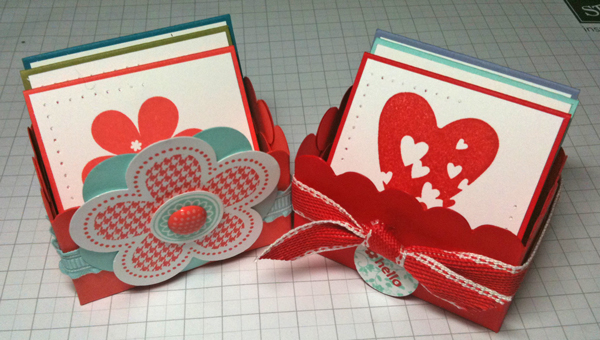 |
| Both boxes side by side. |
 |
| Boxes and notecards/tags |
I hope you found this tutorial useful.Whilst I haven't shown it, this cute little box would defiantly be big enough to hold some treats, you would just need to use a cello bag ~ hmmm, I can feel a Mother's day or Easter project coming on
take care ... xx

Project Ingredients
Stamp Sets : "Sprinkled Expressions" - FREE Sale-a-bration set & "Tiny Tags"
Card stock : "Whisper White"; "Poppy Parade"; "Pool Party"; "Calypso Coral"; "Lucky Limeade"; "Wisteria Wonder" & "Island Indigo"
Accessories :1/2" Stitched Ribbon in "Poppy Parade"; "Pool Party" ruffled ribbon & "Calypso Coral" brad from the "Printed Brads"
Colour : "Poppy Parade"; "Pool Party"; "Calypso Coral"; "Lucky Limeade"; "Wisteria Wonder" & "Island Indigo"
Tools : "SNAIL" adhesive; Dimensional Adhesive; Glue Dot; "3/4" Circle" punch; "Posy" Punch Big Shot machine & "Scallop Square" die,
A great clear tutorial, thanks for taking the time to share it with us :-)
ReplyDeleteI can see many uses!
Hugs xx