Showing posts with label Events - Christmas. Show all posts

Sunday, 20 January 2013

Hello & a Sale-a-bration sneak peek

Hi there,

Sorry I've not posted in a while, life has been busy but I have found the time to do some crafting so I do have some projects to share with you made with lovely new products that will be available very soon.

I know it's late on Sunday but I just wanted to quickly share with you the card I made as my Christmas Thank You card.


I used the "Evergreen" stamp set, which is just gorgeous and can be found in the Autumn/Winter mini catalogue. 


The card base comes from the "Card & Envelope notes" pack, which is perfect when you want to make a stack of cards such as a Thank You card.  I also used the "Brushed Gold" card stock, which is so shimmery and pretty.  This close up also shows another stamp from the "Evergreen" stamp set that I stamped in "Champagne Shimmer Mist" over the top of the main tree section.  Now if you like the look of this stamp set, it's in the Autumn/Winter catalogue, which runs out on 31st Jan, so if you like the look of this set get your order in soon.

Noticed that I haven't mentioned the stamp used for the "Thanks" sentiment yet?  Well, it's part of a new collection called "Vintage Verses" that is a free set that you can get as part of the "Sale-a-brations" event which starts on Tuesday - yay! ~ Free stuff!!  

More about Sale-a-bration on Monday, until then... x


Sunday, 16 December 2012

ABAC Sunday ~ Christmas Tree decorations

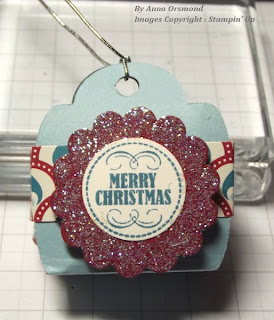
Hello, my Anything But A Card, (ABAC), Sunday this week I am sharing a little Christmas Tree decoration that I made using the mug die from the 'Holiday Collection' framelit dies.


I cut 2 of the little mug shapes with a little extra cardstock at the bottom so that I would have somewhere to adhere the two pieces together.  I then used my Crop-a-dile to punch a hole in the 'handle' section of the mug.

This makes them look like little hand-bags - which is very cute!


I added a little chocolate from my trusty tub of "Celebrations" and wrapped a piece of DSP from the 'Festival of Prints' paper stack round the middle to hold it closed.  

On the blue one, I used the 1-1/4" Scallop circle punch to punch out a 'Cherry Cobbler' scallop circle.  I used 'Island Indigo' ink pad to stamp out an image from the 'Mixed Medley' stamp set and adhered it to the centre of the scallop circle using 'Snail' adhesive.  I then used the '2-way glue pen' round the outside edge of the scallop circle and covered it is 'Dazzling Diamonds' glitter.    


On the 'Real Red' one, I used adhered a 'Vintage Faceted Designer Button' that using glue dots after I had threaded through and tied a bow using some silver cord from my stash.  I used the same cord threaded through the hole in the mug's handle area to that they could hang from the Christmas tree.

I'm going to try and do a very quick tutorial on this and post later today.  See you then ....xx

Saturday, 15 December 2012

Saturday Inspiration - Part 2 ~ You tube inspiration

I know, 2 posts in one day but I wanted to share two lots of cards with you today to make up for not blogging much recently.

I was inspired to make this card after seeing an ad for a video by Kristina Werner, I haven't see the video, just saw the card.


I've used my favourite wheel again, 'Musical Notes' which I've just been obsessed with this year.


I used the same basic layout as the card I saw on You tube and did it in two colour ways, 'Real Red with 'Very Vanilla'  which seems all warm and cosy to me.


The other colour way is 'Whisper White', 'Midnight Muse' and 'Bashful Blue'.  Using blues makes the card look all frosty, which is another thing I've been obsessed with this year.


I used one of the embossing folders from the 'Delicate Designs Folders' duo pack.  I know it isn't snow, but it really gives the impression of it.  The little snow flake stamped image is from the 'Make a Mitten' stamp set, and obviously I've used the 'Mitten' punch for the mittens, which is so adorable.

Hope you like them, have a great weekend ..  xx

Saturday Inspiration - Pinterest

Hello,

I've seen lots of Christmas Present type cards on Pinterest recently, and this style stayed in my mind for some reason so I had to give it a go.


As you can see, the style is very simple and easy to replicate with very little in the way of supplies.


I think a card like this would be perfect for a male card, which is great for me as I have a few single male friends and relatives that are always a bit difficult to choose a card for.


They are good for girlies too, you just have to choose a more feminine embellishment 


This card has the gorgeous 'Vintage Faceted Designer Buttons'.  I also sprayed both cards with the 'Champagne Mist' shimmer paint that I've mixed with Surgical Spirits, which makes it perfect for spritzing.  

Unfortunately, I don't remember who made the card that inspired me, but if anyone know's please let me know so I can give them credit.

Friday, 14 December 2012

Quick Christmas card


Sorry I've not blogged for a while, combination of not being able to access by blog and working away from home.

Anyway, I've got a quick project to share with you.


It uses the 'Heart of Christmas' stamp from the Autumn/Winter mini catalogue.  It's a great little stamp as you can whip up lots of cards really quickly.


I teamed it up with 'Whisper White' card stock that had been embossed using different embossing folders and with just a small matt of 'Real Red' card stock to make it pop even more.  The little snowflake stamp is from the 'Make a Mitten' stamp set, which is just adorable.

That's it for now, I have been crafting, so lots to show you so lots to blog about, lets just hope blogger lets me.   xx

Monday, 26 November 2012

'Christmas Present' Cards

My project share with you today is a 'Christmas Present' card.  These are so easy to make and a great way to use up scraps.

(Sorry about the dodgy lighting on these!)


I made a traditional green and red card and a slightly less traditional blue and red card.  For some reason I'm really loving blue on my Christmas cards this year.


These are so easy to make.  I made mine by attaching a piece of DSP to a piece of cardstock just a little bit taller than the DSP. I used Stampin' Up's  "Festival of Prints" paper stack, which, for only £6.25 for 48 sheets is great value. Then doing the same thing again but this time using a piece of cardstock that was a little bit taller but a little bit narrower.


The top section is just the DSP.  I use a thin piece of scrap cardstock and put my parcels on to that using snail adhesive which gives me a solid piece. I ran my glue pen on the exposed pieces of cardstock and covered them in "Dazzling Diamonds" glitter 

Ooo ~ sparkly!

I then wrap my ribbon around the parcels and tie off at the top. The additional piece of scrap cardstock helps with this also.  I put dimensional adhesive on the back and pop onto the card ~ done.  

Hope you like this project and get inspired to make some for yourself... enjoy!  xx


Monday, 19 November 2012

Little shiny Christmas Tree

Firstly, sorry about the poor quality of photo in this first image, the light in my craft room is shocking, add that to the fact that I took these photo's at night, there is not a lot of light.  I used an OttLite to craft by, so that's ok, I really want to buy another one, maybe Father Christmas will take pity on me next month!

Talking about Christmas, my project today is another Christmas card.  I used the "Musical Wheel" again, I'm in love with that image this year, the sentiment is from the "Petite Pairs" stamp set.


The tree is cut out using the "Holiday Collection" framelits and it sits on the small scalloped rectangle cut out using the "Scallop Rectangle Clearlit"


The tree was actually cut out of "Whisper White" cardstock and sprayed using the Gold Glow Smooch Spritz.  It doesn't show up that well in the photo, but it has a lovely shimmer that changes in intensity depending on which way you look at the tree.  I also used the "Cherry Cobbler" Dazzling Details to add little blobs to replicate little red baubles on the tree.

Now I have to be honest, this is one of those cards that was created out of bits that I had on my desk that I thought may work together, and I'm pleased I gave it a go.

If you want to know anything about Stampin' Up or their products or would like to book a workshop in the comfort of your own home, please get in contact.

Take care......xx


Tuesday, 13 November 2012

.. and another Christmas Card

Hello again,

Well I have another Christmas card for you today, I have so many to make it's difficult to find time for anything else, but I will hopefully show you something different in a day or two.


It's another one that's quite easy to produce lots of but still looks special due to the embossing, the die cut ornaments and the shimmer.


So far I've made this card in two colours, the gorgeous In Colour "Midnight Muse", I love blue for Christmas cards.,


and also in In Colour "Gumball Green"; you can never go wrong with green where Christmas cards are concerned.


This shot really highlights that great embossing folder and the shimmer and shine you get from the Smooch sprays.  I used "Vanilla Shimmer" again, as I think it makes a card look all frosty but these strays also come in "Gold Glow" and "Silver Foil" if you want to go for a slightly different feel.

Have a great day, until next time ... xx

Saturday, 10 November 2012

SATURDAY INSPIRATION - Gift Tags everywhere!

When I've been visiting crafting blogs lately everyone seems to be making Christmas gift tags and to be honest, I don't usually use gift tags, don't know why but this year I am defiantly going to make some as they are so cute.
I think I was put off gift tags as the one's my mum used when I was little always looked a bit like an after thought.  Now, no disrespect to my parents, but they just wrapped things so they were wrapped, they didn't get how special and exciting a gift looks when it's wrapped beautifully, for them it was more of if it was wrapped and looked vaguely Christmas-like it was good enough.

but I have defiantly discovered the joy of a beautifully wrapped gift and what could be a more perfect start to a beautiful gift than a hand-made, personal tag.

My first tag is a big one, perfect for a larger gift.


It's a 'tucked' gift card, sorry I can't think of a better description but hopefully the picture explains it.  I used a piece of 8" x 8" "Whisper White" card stock that I scored at 2" on each side and cut off the corners to create the basic shape and just folded in one side after another and tucked the last side under the first.


For the sentiment on the outside is from the "Tags til Christmas stamp set and it opens to reveal a sentiment form the "Delightful Dozen" stamp set - wish I love, so many useful sentiments in that set.


On the outside I used images from the "Scentsational Season" stamp set


I also added a bit of 'shiny' to each image.  I used "Dazzling Details on the candy cane, "Cherry Cobbler Dazzling Details" on the gingerbread man's shiny buttons.  I also cut out the gingerbread man using the "Holiday Collection" framelit dies just to give it a bit of additional dimension.


and for the mug I added a rhinestone jewel.


I'll be sharing more gift tags in the run up to Christmas, enjoy!  xx

Thursday, 8 November 2012

Quick Christmas card

Hi there,

Quick post today of a really easy to make but very striking Christmas card


I made it using the "Northern Flurry" embossing folder for the Big Shot machine.  I just ran a piece of "Whisper White" cardstock through the Big Shot, used "midnight Muse ink to add the sentiment from the "Delightful Dozen" stamp in the un-embossed corner and adhered it to a piece of "Midnight Muse" cardstock that I used as my card blank.


I then sprayed it with the "Vanilla Shimmer" Smooch Spritz and I was done, other than to wait for the Smooch Spritz to dry and when it does, it leaves a gorgeous shimmer on the card.

See, easy peasy!  You could whip up a batch of these in no time.

If you require any Stampin' Up products or have any questions, please do not hesitate to get in contact.

Hope you have a good day.... xx

Tuesday, 6 November 2012

A couple of Ornamental Christmas cards

Hello there,

I hope your Bonfire night was full of fun and lovely hot things to eat and drink.

My share for you today is a Christmas card, well, now it's November it feels as though lots of Christmasy things are allowed.


For my base card I used "Naturals White" cardstock and I used the lovely new stamp set "Ornament Keepsakes" to stamp out the 2 ornament elements.


This is a lovely stamp set and comes with coordinating "Holiday Ornaments" framelits dies. What's even better about this coordinating products is that Stampin' Up as selling them either individually or as a "Ornament Keepsakes" bundle, which works out cheaper - yay!


I used just two ornament stamps and dies for these cards but there are 9 stamps in this set in total.

I used the "Music Notes" wheel for the background, which I love and is perfect for Christmas cards but also I think it would be great for male cards.

The sentiment is from "Curly Cute" - seriously, how great is this stamp set, defiantly one that every stamper should have in their inventory.  I heat embossed this in white onto a piece of "Midnight Muse" cardstock.

I only made these in "Midnight Muse" but I am defiantly going to be replicating these in a few more colours over the next few days.

Enjoy!    xx


"Holiday Ornament" framelit die
"Ornament Keepsakes" stamp set


Monday, 5 November 2012

Free card for November 2012

Hello there,

Now in the interests of full-disclosure, I'm writing this post on Sunday afternoon.  I figure that the best way for me to try and make sure I keep up to date with posting is whenever I got a bit of time to schedule a few post, as I love sharing what I do with you all and I've missed blogging.


My share today is actually my FREE card for November.  Anyone who places a Stampin' Up order through me in the month of November will receive one of these cards for free.  There are two versions, one in "Midnight Muse" and one in "Raspberry Ripple"   

I wanted to share this card today as who wouldn't want to be holding a lovely mug of hot chocolate tonight whilst watching the fireworks, with maybe a little dram of something grown-up in the mug for good measure!

If you place an order for less than £50, (before P&P), then you get one card, if you place an order for more than £50, then you get both!


I used the "Scentsational Season" stamp set, which is sooo cute and comes with coordinating dies for the Big Shot machine.  I just stamped the mug image directly onto the "Whisper White" card stock that I got form the "Note Cards & Envelopes" set.  You get 20 5 x 3-1/2" note cards and envelopes in the pack and they are the perfect size for whipping up a batch of cards really quickly.

The sentiment is from the "Polar Party" stamp set, which is one of my favourites. 

I used "Basic Grey" classic ink pad for the steam, which I stamped off once to give a light grey colour.  I then used "Dazzling Details" which is glitter glue and at only £2.25, is fabulous and will last you for ages.

You can't really see it on these cards, but I also added a "Rhinestone Jewel" to the centre of the snowflake on the mug.

Hope you like them, have a great day, and BE CAREFUL if you have fireworks tonight!! ... xx