Showing posts with label Technique - Boxes and Bags. Show all posts

Friday, 2 March 2012

Birthday collection for a special friend - The gifts

Yesterday I shared with you the card I made for my upline and good friend, Sarah-Jane, today I am sharing the gifts I made for her.

As you can see I kept the "Domestic Goddess" DSP theme going on her gifts too.

First I made a bag and put in some chocolate, well, it's not a birthday without some chocolate!

Bag overview

Close up on sentiment on bag

I also made her a box to house her main gift.


It was a "pizza" style box with a belly band made using the "Lace Ribbon border" punch and the "Top Note" die.

View from above


This view shows want the box looks like from the side when the belly band is on.

.. and the gift all wrapped up fits in perfectly.

I had lots of fun making these projects, just hope Sarah-Jane realised that they where made with love for such a special friend. ... xx


Project Ingredients

Stamp Sets : "Tiny Tags"
Card stock : "Basic Gray" & "Whisper White" 
Accessories: Basic Pearls; "Domestic Goddess" DSP; Designer Printed Brads; Metallic Brads &  "Pool Party" 3/8" Ruffled Ribbon 
Colour : StazOn Ink
Tools : "SNAIL" adhesive; Glue Dots adhesive; Big Shot machine; "Top Note" die; "5-Petal Flower" punch; "Fancy Flower" punch; "Jewellery Tag" punch; "Lace Ribbon border" punch & "Boho Blossoms" punch.

Tuesday, 7 February 2012

Valentine's day ideas - No.5

Hi,

Another frustrating day with my internet connection dying, but I do just want to quickly share another Valentine's project with you before it goes again!

It's a little treat box with handle.

Close up of the front of the box
 I used the "Poppy Parade" & "First Edition" Speciality DSP combination that I think looks great.

I put in lots of lovely "Love Heart" sweeties, well, what else would you put in a Valentine's treat box?? I know, I know, diamonds would be better, but I did add a rhinestone jewel to the heart, unfortunately that's the best I can do.   


Side view with heat embossed large heart.
I added two sizes of heart on this project and used the "Heart to Heart" punch and the "Full Heart" punches.  I used VersaMark ink to stamp on the floral image from the "Clearly for You" stamp set and heat embossed using clear embossing powder.


As you can see from the above picture, the box is quite roomy inside, so you can be quite generous with the amount of treats you put inside.

Hope you like it, remember, if you would like to learn how to make a treat box like this or any of the projects that I share whilst staying in the comfort of your own home, then get in contact and arrange a workshop for you and your friends, who knows what you could find yourself creating!

Take care and hopefully chat again tomorrow ~ Internet willing    xx


Project Ingredients

Stamp Sets : "Clearly for You"
Card stock : "Poppy Parade"
Accessories : Clear Embossing powder; "First Edition" Speciality DSP; "Poppy Parade" Stitched-Poly ribbon; Rhinestone jewels & Window sheets.
Colour : VersaMark ink pad.
Tools : "SNAIL" adhesive; Dimensional Adhesive; Glue dots;  "Full Heart" punch; "Heart to heart" punch

Also: Velcro from my local art supply shop.

Sunday, 29 January 2012

"Scallop Square die" Box Tutorial

As promised early today, I have pleasure in showing you how to make this Scallop Square die box.


Cut out a Square Scallop using your "Square Scallop" die for the Big Shot.  Using either your scoring attachment on your paper trimmer or your bone folder, score between the 2nd and 3rd scallop and then the 7th and 8th, turn the piece by 90 degrees and then score between the 3rd and 4th scallop and the 6th and 7th scallop.  See picture on the left.

Cut on the score lines between the 3rd and 4th scallop and 6th & 7th score lines up to the score line going in the other direction, Add Sticky Strip, all as indicated in the photo on the left.

If you find that Sticky Strip is a bit unforgiving for you, then use a glue stick such as Pritt Stick and go over the adhesive on the sticky strip prior to fixing your project together, this should make things a bit easier.


Lift up and adhere the walls of box that only have the one strip of Sticky strip, this is the back of the box.

Lift up the other walls of the box.  Make sure the middle scallop on the sides match up, this should be easily achieved.

You can now decorated your box.  I added a piece of "Pool Party" ruffled ribbon around mine, adhered at the front. I stamped an image from the "Posy Punch" stamp set in "Calypso Coral" ink and punched that and a piece of "Pool Party" cardstock out using the "Fancy Flower" punch, adhered them together.  I stamped the circle image, also from "Posy Punch" stamp set, added a "Calypso Coral" brad from the "Printed Brads" collection and adhered that to the punched out piece with a dimensional and adhered the whole embellishment over the ribbon with another dimensional.


Both boxes side by side.


Boxes and notecards/tags

I hope you found this tutorial useful.Whilst I haven't shown it, this cute little box would defiantly be big enough to hold some treats, you would just need to use a cello bag ~ hmmm, I can feel a Mother's day or Easter project coming on
take care  ... xx
 
 
Project Ingredients

Stamp Sets : "Sprinkled Expressions" - FREE Sale-a-bration set & "Tiny Tags"
Card stock : "Whisper White"; "Poppy Parade"; "Pool Party"; "Calypso Coral"; "Lucky Limeade"; "Wisteria Wonder" & "Island Indigo"
Accessories :1/2" Stitched Ribbon in "Poppy Parade"; "Pool Party" ruffled ribbon & "Calypso Coral" brad from the "Printed Brads"
Colour : "Poppy Parade"; "Pool Party"; "Calypso Coral"; "Lucky Limeade"; "Wisteria Wonder" & "Island Indigo"
Tools : "SNAIL" adhesive; Dimensional Adhesive; Glue Dot; "3/4" Circle" punch; "Posy" Punch Big Shot machine & "Scallop Square" die,

Scallop Square box CASE

Morning,

Thank you for dropping by my blog.  Today I'm sharing a project that I CASE'd from a photo I saw on some ones blog of some projects that where showcased at a Stampin' Up! event in the US recently.

It's a little box made from the Scallop Square die for the Big Shot.


The Scallop Square die is made by Sizzix exclusively for Stampin' Up!  The little box is approximately 2 1/2" x 1 1/2", with a height of approximately 1 1/2" to the top of the scallop.  The little cards inside are 2 1/4" squared.  The images on the little notecards/tags come from the FREE Sale-a-bration set, "Sprinkled Expressions".  This is one of the sets available for free when you place an order for £45 or more during Sale-a-bration. Please click on the link to the left (and a little up)  for more details.


As I mentioned, I saw this project from a photo taken at a Stampin' Up! event.  That's one of the many great things about being a Stampin' Up! demonstrator, they are always trying to help you with ideas and training both via the demonstrators exclusive website and events.

If you've ever been interested in becoming demonstrator, then now is the perfect time as during Sale-a-bration anyone who signs up to be a demonstrator can choose any stamp set of any value from the current catalogues absolutely free.  If you would like more information on this or any thing to do with Stampin' Up!, then please do not hesitate to get in contact with me for a chat, my email address is in the top left hand corner.

Oh, and if you are reading this before around 2pm today, (Sunday 29th Jan), then please pop back later this afternoon as I will have a tutorial on how to put this adorable little box together, and you'll get to see these cute little notecards/tags in a bit more detail.

Until later... xx


Project Ingredients

Stamp Sets : "Sprinkled Expressions" - FREE Sale-a-bration set & "Tiny Tags"
Card stock : "Whisper White"; "Poppy Parade"; "Pool Party"; "Calypso Coral"; "Lucky Limeade"; "Wisteria Wonder" & "Island Indigo"
Accessories :1/2" Stitched Ribbon in "Poppy Parade"
Colour : "Poppy Parade"; "Pool Party"; "Calypso Coral"; "Lucky Limeade"; "Wisteria Wonder" & "Island Indigo"
Tools : "SNAIL" adhesive; Dimensional Adhesive; Glue Dot; 3/4" Circle punch;  Big Shot machine & "Scallop Square" die,

Wednesday, 28 September 2011

Box Tutorial

Hello again,

As promised, below is my tutorial for the box I shared a couple of weeks ago.  This box is slightly different as the sides are not adhered together, which I like as it means you can easily put a little secret message on the inside bottom of the box that just the recipient will see when that take out the goodies.

Please note that the sizes of this project give you the largest size box from 1 sheet of A4.

Items Needed 

* 1 x sheet of A4 cardstock ~ I used "Naturals Ivory" as I think it has a nice weight for a box
* Ruler
* Pencil
* Adhesive ~ I used Tombow Mono Multi Glue, good a strong
* Bone Folder
* Scissors
* Fiskers Paper Trimmer ~ I used mine to make cutting and scoring easier, but you can manage without if you have the other tools.

Step by Step tutorial

Step 1

Cut your A4 sheet into 2 pieces 
1 at 210 x 200 mm, (Shown), this is the box body
1 at 95 x 105 mm, (not shown), this is the lid

Step 2

Take your box body piece and along the 210 edge, score at 70 and 140mm
Turn and score along your 200 edge at 70 and 130 mm
Burnish all score lines with your bonefolder


Step 3 

Using your pencil and ruler, make a mark 20mm to the left of your 1st score line and 20mm to the right of your 2nd score line, turn the cardstock one turn to the left and repeat until all side have been marked. 


Step 4

Using your ruler, join up the top, left hand mark to the bottom left hand mark, repeat for the right hand make, turn the page 1 turn and repeat.  You will notice that the marks intersect in the corners. 

These corners need to be cut off. (see illustration for Step 5)


Step 5

(Showing the corners cut off)

Taking your ruler and bone folder, score from the corner of the cut section to the corner of the scored section ~ see illustration. Using your bonefolder, burnish these score lines - This is a bit tricky.


Scored and ready to go.  No are now on to the lid.


Step 6

Take your lid piece of cardstock and Score all 4 sides at 15 mm and burnish your scorelines.


Step 7

With your scissors, snip on 1 of the corner score lines up to where the score lines intersect ~ see illustration


Step 8

Where you made your cut, cut an additional small diagonal line cut.  I find this makes it easier to make neat lid edges when gluing together.


Step 9

Glue the outside section of the small cut corner piece to the inside of the lid side ~ see illustration.  I use small pegs to hold everything together whilst the glue is drying but you could used paper clips.  
I prefer glue rather that sticky strip as it gives you a little time to get the edges joined neatly and the Tombow is very strong.


Step 10

Push the cut edges of your box inwards and pop on the lid


The lid is strong enough to keep the box closed on it's own.  Now, have fun and decorate as you wish


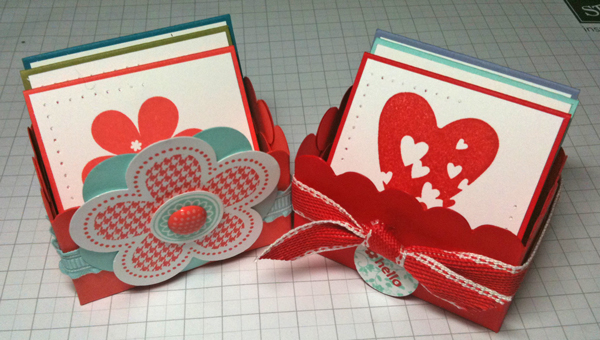
As a reminder, here is the one I shared a couple of weeks ago.


Hope you've been able to follow the tutorial ok as it's the first one I've written.  I have written lots of training materials and specification documents but only for technical things never crafty ones, so it's a bit scary.  If there is anything that you would like clarified or thing a few more pictures would be helpful, please do not hesitate to let me know, my goal here is to make this an easy to follow tutorial that everyone could copy so happy to change things a bit until it is.

Hopefully this was helpful, take care ... xx


Project Ingredients

Card stock : "Naturals Ivory" Cardstock.
Tools : Paper trimmer; "Paper Snips", Bone folder, Tombow Mono Multi glue, scissors. Oh, and a pencil.