Showing posts with label Stamp Set - Happiest Birthday Wishes. Show all posts

Saturday, 29 September 2012

SATURDAY INSPIRATION ~ Pinterest

Hi there,

Very late posting today but I did want to quickly share with you a card based on some cards I've seen on Pinterest.  I've seen a few cards like this so I can't give any one person the credit, but I think it's a great design, so whoever came up with it first is a little star.


Basically the card is coloured card stock stripes with a sentiment intersecting them, this could be done either by stamping directly to the base layer, as I have done, or by adding a sentiment on an additional layer and laying over the top.

The sentiment I used is from the "Happiest Birthday Wishes" stamp set, which is a Hostess only item.  This set is only available until the end of tomorrow, so if you want to get hold of it, please contact me ASAP.

I love this card style and it's so great to get some inspiration on men's cards as it's they can be hard to make, I also love the way that this card uses up the thinnest strips so you can used your scraps.

Enjoy! ... xx


Wednesday, 19 September 2012

Happy Birthday Sue

Yesterday was my cousin Sue's birthday, I don't know which one, (I never ask), but obviously I had to make a card.


I wanted to use the "Butterfly Prints" stamp set and coordinating punch as both are on the retirement list and I love this stamp set, it was one of the first I ever bought from Stampin' Up.

I chose "Wisteria Wonder" and "Perfect Plum" as my colour palette as her favourite colour is lilac.  I actually started by running the wheel from my stash across the card stock layer and embossed the unstamped corners using my "Simply Scored Scoring Tool"  and then left the piece on my craft desk for a couple of days whilst I worked out what I wanted to do before being inspired to use the gorgeous label stamp from the "Everything Eleanor" stamp set to act as a 'resting post' for the butterfly.


I also decorated the inside, but I "stamped off" the colour on the wheel before running it across the "Whisper White" card stock to give it a more subtle effect.


I used lots and lots of glitter around the edge of the butterfly and added basic rhinestones to make it all sparkly and girlie, after all, you've got to have a bit of sparkle on your birthday!


Now that should have been it but I enjoyed making it so much that I found myself making 5 more in different colours!  Do you never do that?


Oh well, at least I've got a small stash of pretty cards all good to go.

Until next time .... xx

Friday, 31 August 2012

Feminine "Twitterpated" card

I thought I would just quickly post another card that using  "Twitterpated" DSP that I also used on my card I shared with you in my previous post as I wanted to show the versatility of this particular paper collection.

As you can see, the paper used on this card is very pretty and feminine with a completely different feel to the paper used on the previous posts card yet it is from the same collection.

The sentiment on the front comes from the "Tea Shoppe" stamp set that is in the Summer Mini catalogue ~ the items in this catalogue are only available until end of today, so if you want this set please get in contact by today!
 
Oh, just to show that the insides can be all pretty too. The sentiment comes from the "Happiest Birthday Wishes" hostess stamp set and the border of flowers comes from the "Bordering on Romance" stamp set.

xx


Project Ingredients
Stamp Sets : "Tea Shoppe"; "Bordering on Romance"& "Delightful Dozen"
Card stock : "Blushing Bride"; "Baja Breeze" & "Whisper White"
Accessories :  "Twitterpated" DSP & "Subtles" collection Flower Brads;
Colour:  "Basic Grey" classic ink pad; "Baja Breeze" and "Blushing Bride" marker pens
Tools : Tape runner adhesive; Dimensional Adhesive; "5-Petal Flower" punch; "Fancy Flower" punch & "Dotted Scallop Ribbon Border" punch.

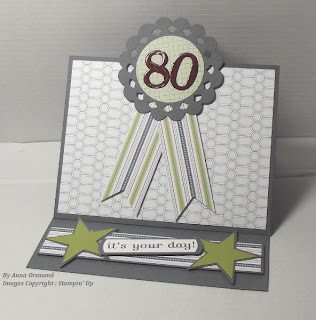
Special 80th birthday card

A couple of weeks ago it was my Uncle Bob's 80th birthday, generally I don't send too many cards to the men in my family but as it was such a special birthday obviously I had to send him a little something to mark such a great landmark birthday.


I made an easel card and used the fabulous "Twitterpated" designer series paper, (DSP), this has to be one of the best value DSP's as it has great designs for men, as you can see from this card, but it also has great feminine designs too so you get a lot more choices when using it and therefore defiantly one to buy if you are on a limit budget.


I used "Perfect Pennants" die circular section of the rosette and the "Timeless Type" dies to cut out the numbers. You can't really see it from this photo, but I added Crystal Effects to the numbers to make them all shiny.


I made the layered stars with a star punch I had in my stash, I cut all four stars with it and then trimmed down the Lucky Limeade ones so they would sit nicely over the Basic Grey ones to give a bit of added dimension and interest.

The great thing about easel cards is they sit up proud when you display them, but, depending on how much you put on them, they fold relatively flat for posting.

I hope he liked it, until next time .... xx


Project IngredientsStamp Sets : "Happiest Birthday Wishes"
Card stock : "Cherry Cobbler", "Basic Grey" & "Lucky Limeade"
Accessories :  "Twitterpatted" DSP & Crystal Effects
Colour:  "Basic Grey" classic ink pad
Tools : Tape runner adhesive; Dimensional adhesive;  Tombow Mono glue; Big Shot machine; "Timeless Type" alphabet die & "Perfect Pennant" die

Saturday, 9 June 2012

Pinwheel Cards

Hello,

Couple of cute little cards for you today,


Pin-wheels are really popular in paper-crafting at the moment, so I thought I'd have a go and make a couple of little ones that would fit on a standard A6 sized card and enjoyed making the first one so much I decided to make another one, this time making the pin-wheel bigger.


They are so quick and easy to make and use the minimum of supplies, plus it brought back happy memories of when I used to make them when I was little, thought I used to make much bigger ones then.

Hope you have a great weekend... xx


Project Ingredients

Stamp Sets : "Happiest Birthday Wishes" & "Sincere Salutations"
Card stock : "Pool Party"; "Basic Black"  & "Whisper White"
Accessories : DSP from the "Tea Time" Simply Scrappin' kit; Designer Printed Brads ^ Brads in "Brights"
Colour:  StazOn In
Tools : Tape runner adhesive;  Dimensional adhesive& "Itty Bitty Shapes" Punch Pack

Friday, 18 May 2012

Another CAS card

Today my share is another CAS card, yes I'm really in to them at the moment, but this time it's a full A6 size card.


I coloured in the centre section by ripping some cardstock and using temporary adhesive to adhere it to the "Whisper White" piece then, using a sponge, I added the colour in circular motions, going over the ripped edges.  When I was happy with the depth of colour, I then stamped the images on using StazOn ink and coloured them in using marker pens.


I also stamped the image on a piece of "Whisper White" for the inside of the card, but this time I used "Crumb Cake" ink and stamped off so that the image would be very soft.

I really love the effect when you add a small layer  of "Basic Black" card stock round your main layer.

Hope you like it too.... xx

 
Project Ingredients

Stamp Sets : "Simply Soft" & "Happiest Birthday Wishes"
Card stock : "Basic Black"; "Whisper White" & "Old Olive
Colour:   "Old Olive" classic ink, "Old Olive" and "Calypso Coral" marker pens & StazOn ink
Tools : Tape runner adhesive

Tuesday, 24 April 2012

Male birthday card

Hi there,

Really quick post today as I don't know where the day has gone.  Mostly today I've been making 'swop' cards for Stampin' Up's regional training event this coming weekend and the day just ran away from me and I've still not finished the 'swops'! 

I did want to share a card I made as I have a few male birthday's coming up and I wanted to get few done so I would have a little stash.


As you can see, it's really simple and I made 4 of them in total, only changing the colour of the main cardstock, but I stuck to the the 'Regals' family of colours as they are great for men.  Oh, and I used a circle punch for the 'ticket' style corners.

Hope you like it, must dash  .... xx


Project Ingredients

Stamp Sets : "Happiest Birthday Wishes"
Card stock : "Basic Black";  "Not Quite Navy" & "Whisper White"
Accessories : Silver Brads & 1 1/4" Striped Grosgrain Ribbon in "Basic Black"
Colour:  StazOn ink
Tools : Tape runner adhesive; Dimensional adhesive "Square lattice" embossing folder; Big Shot machine & Circle punch

Tuesday, 17 April 2012

"Chevron" Technique Tutorial

Hello again, as promised in my post form this morning, I have for you a tutorial showing how to do the "Chevron" technique.

Step 1


 You need some stripy patterned paper, I used "Cheerful Treat" DSP, the hostess only item.

I cut a section of 6 x 6"


Step 2


 I cut this section on the diagonal.


Step 3


Then I cut 1cm strips using the diagonal line as my straight edge to base my cuts on.


Step 4


I then repeated this for another 6 x 6" section of this DSP.  I used the other section that had the same colours.


Step 5

Then match up the patterns, alternating the direction the lines go to produce the "Chevron" effect.

Keep doing this until you find a pattern you like.

Step 6


I arranged mine so that a specific pink line within the pattern lined up, (see area in box within photo), so that it created a more random looking pattern. 


Step 7


Once you are happy, adhere to a piece of scrap paper.


Step 8

Trim off edges and make to required size.

Obviously the more pieces of paper you can match up the larger the size you can have.  This is easier with a relativity simple stripe of just a few colours, but my sample is very colourful, but hopefully helps you to see the pattern.

 Step 9

Create your card.

I matted mine on a piece of "Rich Razzlebury" cardstock, which I adhered to the right side of the "Old Olive" card blank, then added a "Very Vanilla" taffeta bow on the left side, added a sentiment from the "Happiest Birthday Wishes" stamp set.


Hope this was clear and helpful, if you have any questions or need anything clarifying, please do not hesitate to get in contact or leave a comment.

Thanks  ... xx


"Chevron" Technique

A very brief post for you this morning as I wanted to quickly share with you a card that highlights the "Chevron" technique.


It's made by placing stripy patterned paper next to each other to form the chevron pattern.

I was hoping to have a little tutorial for you on how to do this but I'm still trying to sort out the photos so I will be back later today, hopefully, with all the details on how to do this very striking technique.

Until later ... xx


 Project Ingredients

Stamp Sets : "Happiest Birthday Wishes
Card stock : "Lucky Limeade" & "Whisper White"
Accessories : "Cheerful Treat" DSP
Colour:  "Lucky Limeade" & "Concord Crush"  classic ink pads
Tools : Dimensional Adhesive; Tape runner adhesive;  "1-3/4" Scallop" punch & "1-3/8" Circle" punch

Monday, 16 April 2012

Monday CASE'd Book

I have a CASE'd card for you today.  For those who are unfamiliar with the term it means that I've copied it, which in the stamping and paper craft world is completely acceptable and in some ways encouraged, just as long as you give due credit to the originator.

My card today was CASE'd from the Stampin' Up's catalogue and the original can be found on Pg 120.


I changed the colour and a few of the embellishments but other than that, it's pretty much the same.  I made this card a couple of weeks ago when I was feeling like I had lost my crafty mojo, so, for me, CASE'ing a card was a great way to get me making something so that I felt inspired again.  That's the great thing about the catalogue, it's got so many great projects in there to inspire and spark off the imagination.

Have a great day .... xx


 Project Ingredients

Stamp Sets : "Aviary";  "Happiest Birthday Wishes" & "Tiny Tags"
Card stock : "Whisper White" & "Night of Navy"
Accessories : Patterns Designer Series paper Stack in Regals.
Colour:  StazOn Ink; "Pool Party"; "Island Indigo" & "Poppy Parade" classic ink pads
Tools : Dimensional Adhesive; Tape runner adhesive;  "Dotted Scallop Ribbon" border punch; "Tag" punch; "Corner" Punch

Saturday, 31 March 2012

"Sale-a-bration" ends today ~ last look

Hi there, hope you are having a lovely Saturday.

Today I will be sharing the last lot of projects I've made using the exclusive products you can get for free as part of this years "Sale-a-bration" event.


These two cards are basically the same, the only real difference is that on the top card I used the "Postage Stamp" punch and on the bottom the "1 1/4" Square" punch.  The card blanks for these are 2/3rd of a sheet of A4 "Confetti Cream" cardstock folded in half.  Cards this size fit into a standard business envelope.


The next couple of cards are Easter cards, which I am waaaay behind on!


The "Everyday Enchantment" DSP is perfect for Easter projects.


On both of these cards I used the large image from "Creative Elements" stamp set as a background stamp.


This next card has a very simple colour palette being just Black, White & Red. This uses the "Fresh Vintage" stamp set from the "Sale-a-bration" collection.


Just to add some interest, I added a string of pearls to underline the sentiment and also on the centre of the butterfly that I cut out using "Beautiful Wings" embosslit and the "Everyday Enchantment" DSP.


... and finally,

A celebration card using the "Outlined Occasions" stamp set, which is another "Sale-a-bration" option.

Well I hope you have found some inspiration amongst these last few projects, I can honestly say that the products being offered for free as part of this years "Sale-a-bration" is outstanding and I'm sorry that they will no longer be available after today, so if you want to get your hands on, please don't delay and get in contact today as I would hate for anyone to be disappointed.  Remember, you can choose 1 item for every £45 spent

Thursday, 8 March 2012

Retro Sketches Challenge No.1

My share today is a project I made to enter the challenge over at Retro Sketches  They are a new challenge site and I loved their first sketch, so obviously I wanted to join in.

Challenge Sketch
For my card I turned the sketch  by 90 degrees so that I could make a portrait card.


I used "Spice Cake" DSP, which is new in the Spring Mini catalogue. This paper is absolutely gorgeous in design and colour palette.  I stamped the sentiment with "Soft Suede" ink, then used the "Stamp-a-ma-jig" to get perfect alignment then stamped again using Versamark ink so that I could heat emboss using clear embossing powder.  This makes the sentiment lovely and shiny, not that you can see it in this photo, unfortunately. The main image is the "Triple Treat" stamp, it's one of the "a la carte" stamps which means it's really affordable, but by using the punches that coordinate with it perfectly, you can be really creative with it.  (see project ingredients for the punches used).
This card came together really quickly and I was really please how it came out, though I think I made have gone a bit mad with the basic pearls ~ lol!

Hope you like it. .....  xx


Project Ingredients

Stamp Sets : "Happiest Birthday Wishes" & "Triple Treat Flower"
Card stock : "Pool Party"; "Whisper White"; "Soft Suede" & "Very Vanilla"
Accessories: Basic Pearls; "Spice Cake" DSP; "Pool Party" ruffled ribbon & clear embossing powder
Colour :"Soft Suede"; "Pool Party"; "More Mustard" & Versamark ink
Tools : "SNAIL" adhesive; Dimensional Adhesive; "5-petal Flower" punch; "Fancy Flower" punch; 1/2" circle punch & Heat Tool