Tuesday 31 January 2012

Valentine's day ideas - No.1

Over the next few days I'm going to share with you a few Valentine's day ideas, hope you like them and pick up something that may be useful to you in your Valentine's day crafting.

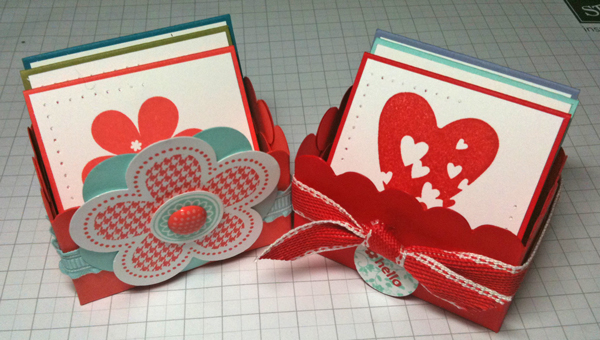
Today's share are a couple of 1-layer cards, made in the same way and using the same stamp set, "You are Loved" which is in the Spring Mini right now and is absolutely gorgeous.

The first card uses the large flourish from the set. On both cards I used a piece of printer paper to mask off the central section then used the "Parlor Prints" background stamp to stamp the image on the top and bottom edges.  I inked up the image using "Chocolate Chip" classic ink, used a blender pen to remove the ink from the word 'Valentine's' then coloured it in with the "Real Red" marker pen and then did the faux stitching with the "Chocolate Chip" marker pen.


This second card uses the large heart.  I followed the same process as the above card only this time I inked up the main image using the "Mahogany" ink spot from the distressing essentials kit.


Hmm ... I can't make up my mind which one I prefer, what do you think?


x

Project Ingredients

Stamp Sets : "You Are Loved" & "Parlor Prints"
Card stock : "Crumb Cake"
Colour : "Chocolate Chip" Classic Ink pads; "Real Red" & "Chocolate Chip" Marker pens & "Mahogany" Distressing ink spot.
Tools : Blender Pen

Sunday 29 January 2012

"Scallop Square die" Box Tutorial

As promised early today, I have pleasure in showing you how to make this Scallop Square die box.


Cut out a Square Scallop using your "Square Scallop" die for the Big Shot.  Using either your scoring attachment on your paper trimmer or your bone folder, score between the 2nd and 3rd scallop and then the 7th and 8th, turn the piece by 90 degrees and then score between the 3rd and 4th scallop and the 6th and 7th scallop.  See picture on the left.

Cut on the score lines between the 3rd and 4th scallop and 6th & 7th score lines up to the score line going in the other direction, Add Sticky Strip, all as indicated in the photo on the left.

If you find that Sticky Strip is a bit unforgiving for you, then use a glue stick such as Pritt Stick and go over the adhesive on the sticky strip prior to fixing your project together, this should make things a bit easier.


Lift up and adhere the walls of box that only have the one strip of Sticky strip, this is the back of the box.

Lift up the other walls of the box.  Make sure the middle scallop on the sides match up, this should be easily achieved.

You can now decorated your box.  I added a piece of "Pool Party" ruffled ribbon around mine, adhered at the front. I stamped an image from the "Posy Punch" stamp set in "Calypso Coral" ink and punched that and a piece of "Pool Party" cardstock out using the "Fancy Flower" punch, adhered them together.  I stamped the circle image, also from "Posy Punch" stamp set, added a "Calypso Coral" brad from the "Printed Brads" collection and adhered that to the punched out piece with a dimensional and adhered the whole embellishment over the ribbon with another dimensional.


Both boxes side by side.


Boxes and notecards/tags

I hope you found this tutorial useful.Whilst I haven't shown it, this cute little box would defiantly be big enough to hold some treats, you would just need to use a cello bag ~ hmmm, I can feel a Mother's day or Easter project coming on
take care  ... xx
 
 
Project Ingredients

Stamp Sets : "Sprinkled Expressions" - FREE Sale-a-bration set & "Tiny Tags"
Card stock : "Whisper White"; "Poppy Parade"; "Pool Party"; "Calypso Coral"; "Lucky Limeade"; "Wisteria Wonder" & "Island Indigo"
Accessories :1/2" Stitched Ribbon in "Poppy Parade"; "Pool Party" ruffled ribbon & "Calypso Coral" brad from the "Printed Brads"
Colour : "Poppy Parade"; "Pool Party"; "Calypso Coral"; "Lucky Limeade"; "Wisteria Wonder" & "Island Indigo"
Tools : "SNAIL" adhesive; Dimensional Adhesive; Glue Dot; "3/4" Circle" punch; "Posy" Punch Big Shot machine & "Scallop Square" die,

Scallop Square box CASE

Morning,

Thank you for dropping by my blog.  Today I'm sharing a project that I CASE'd from a photo I saw on some ones blog of some projects that where showcased at a Stampin' Up! event in the US recently.

It's a little box made from the Scallop Square die for the Big Shot.


The Scallop Square die is made by Sizzix exclusively for Stampin' Up!  The little box is approximately 2 1/2" x 1 1/2", with a height of approximately 1 1/2" to the top of the scallop.  The little cards inside are 2 1/4" squared.  The images on the little notecards/tags come from the FREE Sale-a-bration set, "Sprinkled Expressions".  This is one of the sets available for free when you place an order for £45 or more during Sale-a-bration. Please click on the link to the left (and a little up)  for more details.


As I mentioned, I saw this project from a photo taken at a Stampin' Up! event.  That's one of the many great things about being a Stampin' Up! demonstrator, they are always trying to help you with ideas and training both via the demonstrators exclusive website and events.

If you've ever been interested in becoming demonstrator, then now is the perfect time as during Sale-a-bration anyone who signs up to be a demonstrator can choose any stamp set of any value from the current catalogues absolutely free.  If you would like more information on this or any thing to do with Stampin' Up!, then please do not hesitate to get in contact with me for a chat, my email address is in the top left hand corner.

Oh, and if you are reading this before around 2pm today, (Sunday 29th Jan), then please pop back later this afternoon as I will have a tutorial on how to put this adorable little box together, and you'll get to see these cute little notecards/tags in a bit more detail.

Until later... xx


Project Ingredients

Stamp Sets : "Sprinkled Expressions" - FREE Sale-a-bration set & "Tiny Tags"
Card stock : "Whisper White"; "Poppy Parade"; "Pool Party"; "Calypso Coral"; "Lucky Limeade"; "Wisteria Wonder" & "Island Indigo"
Accessories :1/2" Stitched Ribbon in "Poppy Parade"
Colour : "Poppy Parade"; "Pool Party"; "Calypso Coral"; "Lucky Limeade"; "Wisteria Wonder" & "Island Indigo"
Tools : "SNAIL" adhesive; Dimensional Adhesive; Glue Dot; 3/4" Circle punch;  Big Shot machine & "Scallop Square" die,

Saturday 28 January 2012

Ah, much more girlie..

Have to be very brief today as there's lots to do but wanted to share this with you quickly. So for the last couple of days I've posted a couple of cards I've made for my sister who's birthday it is today.  As I mentioned in those posts, I've had to restrain myself from being girlie as that just isn't her, so in order to let out my trapped girlishness I made a card with pretty paper, pretty punches and pretty sentiments all in pretty colours


- there now, feeling much better :o)


Friday 27 January 2012

So Friday again already!  Seriously I do not know where the time goes!

As I mentioned yesterday, my sisters birthday is this weekend, so I made another card for her, this time one that Ben, (DS), could send to her.  I wanted to do a card with a little bit of springtime colour to brighten up these cold January mornings, but, as I mentioned yesterday, she is still quite tomboyish, so I had to be a bit subtle about how I went about it.


As to the layout,  I've seen quite a few cards on various websites that utilise this basic sketch and I really like it  and I can add just enough pretty colours without it being girlie.
The photo looks a bit flecky but that's because I used  "Confetti White" cardstock which has touches of colour embedded into it so I could sneak in a bit more of the 'pretty' and hope she doesn't notice - lol!

Have a wonderful day, chat soon ...xx


Thursday 26 January 2012

It's all gone a bit wrong somewhere :o/

So yesterday I showed you a simple male card, well I had actually cut the cardstock and stamped the background image and the birthday sentiment a couple of times with the intention of making two in the same colour palette and, well, it somehow went a bit wrong and ended up all girlie  :o/


I blame the "Whisper White" piece that I had cut using my "Lace Ribbon" border punch that I had sitting on my desk!  All I did was pick it up to see how it would look over the lovely "Pacific Point" strip and before I knew it,  I had glued it on, butterflies appeared and rhinestones where being taken out of the packet!  Still, I needed a card for my sister whose birthday is at the weekend and this is perfect for her as she is a bit of a tomboy still, so this has nice feminine touches without being all pink and soppy.

Does that every happen to you, start out making one thing and end up with something completely different - lol!

take care ... xx


Stamp Sets : "Happiest Birthday Wishes; "Sanded" Background Stamp - Retired
Card stock : "Whisper White"; "Sahara Sand" & "Pacific Point" cardstock
Accessories : Basic Rhinestones;   
Colour : "Soft Suede" & "Pacific Point" classic ink pads
Tools : "SNAIL" adhesive; Dimensional Adhesive; Glue Dots; "Ribbon Lace" Border Punch; Big Shot machine & "Beautiful Wings" embosslits die,

Wednesday 25 January 2012

Simple male card

Hello there, hope your week is going well.

I haven't got much time to chat today but I wanted to quickly share this card with you. I have a few male birthdays coming up so I wanted to make a male card that could be easily replicated, lets be honest, it can be such a nightmare making male cards than when ever I find a design that works I want to be able to make a few so that I can build up my male cards stash and take the pressure off myself a little bit.


Simple male card


Personally, I think this one is about as easy as it gets - lol!

have a great day ... xx

 
Stamp Sets : "Happiest Birthday Wishes; "Sanded" Background Stamp - Retired
Card stock : "Whisper White"; "Sahara Sand" & "Pacific Point" cardstock
Colour : "Soft Suede" & "Pacific Point" classic ink pads
Tools : "SNAIL" adhesive &; Dimensional Adhesive.

Tuesday 24 January 2012

Sale-a-bration starts today!


Sale-a-bration starts today - Yay!

What? You're not sure what I'm going on about ???  Well, let me tell you..  Basically, for every £45 of products you order from the 2011/12 Ideas Book & Catalogue and the Mini Spring Catalogue, you get to choose an item from any of the products listed in this brochure for free - yes, FOR FREE!!  Now if that isn't worthy of a "Yay" then I don't know what is!


Just to clarify, 1 item for FREE for every £45 spent, so if you spend £90 or more, you can choose 2, if you spend £135 or more, you get to choose 3 etc etc.


And there's more ways to get free stuff
If you host a workshop that generates sales of over £300 you get to choose a free item, double yay!


And yet another way to get free stuff
If you sign up to become a Stampin' Up demonstrator during Sale-a-bration you can choose any stamp set currently available in our catalogues for FREE in addition to the great products you get as part of the Starter Kit. Now let me just stress this bit again, I mean ANY stamp set, there is no price limit on which one you can choose!

If you have any questions or would like more information about booking a workshop or becoming a Stampin' Up demonstrator, then please get in touch using the contact details above and I will help you in any way I can.

Sale-a-bration runs from 24th January until 31st March

take care...  xx

Monday 23 January 2012

Team catch-up make & takes

Hello there,

For some reason I woke up today at 'stupid O'Clock' this morning, but at least it's given me some time to potter around in peace and quiet.

As I mentioned yesterday, today I'm going to share with you what we made at our little teams pre-Christmas get-together.

( Lots of photo's today, so be ready!)


We made an embossed card, but with a difference.

On this card we only embossed a certain area of the card.  This is done by using a piece of chipboard cut into the shape of the area you want embossed.

It's a great technique and really visually effective


We used sponge daubers and Champagne shimmer paint over the embossed surface to highlight the image even more.  It's so pretty and sparkly IRL.


This next project was to show us how to use half a scalloped circle to produce a Christmas tree to used as an embellishment on a card.


This was done with just a three folds, as produces a really cute little tree.


Folded flat, this doesn't look like much, but when you open it, it becomes a lovely decoration.  It is made with square pieces of DSP.


Open it up by pulling the button up the ribbon


and to fix it into position, just push the button back down again when it is fully open, so pretty.

We made it with just 4 pieces of DSP, but it can be made with more and or bigger squares for a flamboyant decoration.

And as it does fold flat so easily, it's great from a storage point of view.


This last project was made using the Mini Milk Carton die for the Big Shot, but as you can see from the picture, it has a lid rather than the traditional folded 'pouring' top.


We also made a little sparkly flower embellishment for the top using a scallop punch


Hope you liked seeing these projects.

I will be doing tutorials for some of them that I will be posting over the next few weeks.


Hope you have a great start to your week... xx

Sunday 22 January 2012

3D team swops

Hi,

As promised yesterday, today I am sharing a couple of 3D projects I got as swops at our little teams pre-Christmas catch up.


This came with a little chocolate inside - yay!


This project from Sarah-Jane is bottle tops that have been decorated and turned into fridge magnets, how cute is that!

Tomorrow I will share with you what we made on the day, until then, have a great day!  xx

Saturday 21 January 2012

Team swop cards

Hi there, hope you are having a good weekend.

Today I'm sharing a few of the projects I got as Swops when I attended our little teams pre-Xmas catch-up. 


It's always interested to see how other people interpret the stamps and tools within the Stampin' Up! range.

Tomorrow I'll share a couple of the 3D projects that I received, until then, take care ... xx


Friday 20 January 2012

Pre-Xmas team catch-up swop card.

Morning, well, I'm so glad it's Friday, not sure what I've actually done this week but for some reason it feels like I've been frantic all week!

Anyway, onto today's share.

Before Christmas we had a team get-together at my upline Sarah-Jane's house and for this event we all made a swop card, here's mine..

My team swop

When you make a 'swop' card you just do the front of a card and everyone swops with everyone else.  It's a way of seeing other people do things as well as maybe getting cards or projects that use products that you don't have yourself, it's a really good way to get motivated and see how others interpret the products used.

For my swop, I used the "Aviary" stamp set, which I just love, that owl is adorable and I also used "Forever Young" stamp set.  This set has a tree stamp, which I used as a background image on the "Perfect Plum" layer of the card just to add a little interest rather than leave the cardstock blank.

I had a wonderful time at our get-together, it's great to be able to meet up with so many talented crafters who are also such lovely people.

My next couple of posts will show you the swops I got in return, I hope you find it interesting.

Take care....  xx


Monday 16 January 2012

Birthday Card for a VIP

Hi there, hope you had a good weekend,

Just before Christmas it was my son Benjamin's birthday.  Now we all know how difficult it can be to do male cards, but for such a VIP, impossible!   So, I decided to just kept it very simple in layout and let the sentiment and the words inside make my statement.


I used the "Happiest Birthday Wishes" stamp set for the sentiment on the front, no surprise there you might think, as I have shared quite a few cards that I've used this set on, but actually, I knew I wanted this set for this exact stamp as I knew I had to use it on my son's card.  He was born on the evening of the 23rd Dec and I've always told him that he is the best Christmas present I've ever had, so I knew this stamp was perfect for a card for him.

I used the "Sanded" background stamp, which is now retired, but you could used the "Texture" jumbo wheel for the same type of effect and the "Confetti" set in Versamark ink on the strip of "Night of Navy" cardstock to break up the plainness of the cardstock.

I also wrote something suitably embarrassing inside, as only mum's are allowed to do, so hopefully the card showed him how special he is to me always on his special day.

Hope you have a great day.. xx


Project Ingredients

Stamp Sets : "Happiest Birthday Wishes; "Confetti" & "Sanded" background stamp - RETIRED
Card stock : "Whisper White"; "Crumb Cake"; "Tempting Turquoise" & "Night of Navy"

Colour : Versamark ink; "Soft Suede" classic ink pad;  "Night of Navy" & "Tempting Turquoise" marker pens.
Tools : "SNAIL" adhesive & Dimensional Adhesive.